Showing posts with label craft. Show all posts

Saturday, 15 June 2013

Picture frame craft (a gift for Nana)


Today is my Nana's 96th birthday, so this week we have been making her some picture frames as a gift from the boys.


I bought some plain wooden frames from Bunnings.


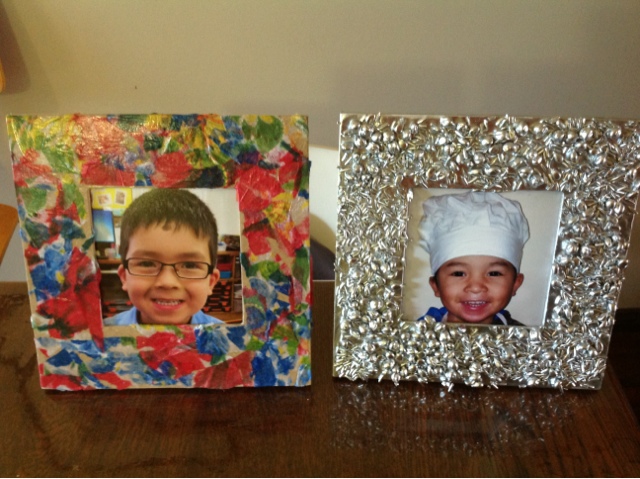
Decoupage frame
I decided to teach Mr Sociable some simple decoupage. He tore small pieces of coloured tissue paper...


covered sections of the frame in PVA glue and then glued on the pieces of tissue paper. 


Once the frame was completely covered, we coated the tissue paper with PVA and left it to dry.


Once it was dry, I inserted a photo of Mr Sociable. 


Textured silver frame
I was originally planning to make Mr Fun's frame by gluing pasta on the wood. But, had run out of pasta and I had to improvise. I gave him a selection of dried chick peas, popping corn and uncooked rice. We put PVA glue on the frame (one section at a time) and Mr Fun sprinkled the peas, corn and rice onto the glue.


He needed a bit of encouragement to keep going until it was all finished, but we did get there in the end!


Franky sprayed the frame with silver spray paint (this was also from Bunnings) and I inserted a cute picture of Mr Fun.


Friday, 24 May 2013

Alphabet Activities for Playtime (A-D)

This term at Playtime, we are learning about the alphabet. The kids and the parents have been really positive about the activities and songs. I have noticed Mr Fun singing the songs and pointing out the letters while we are out and about. 

We have been using the songs and actions from the Jolly Phonics program (http://jollylearning.co.uk/). I have made a poster for each letter (with just one letter and a picture cue on each poster). I really like the Jolly Phonics program because it appeals to different types of learners - visual (the posters), auditory (the songs) and kinaesthetic (the actions for each sound). You can find the songs on YouTube, and buy the book (Jolly Songs) online.

Each week at Playtime, we focus on one letter; we do a craft, a story and teach the relevant song from Jolly Songs.

Aa

Craft: Salt-dough ants
I pre-made the ants and baked them in the oven. I used a skewer to poke holes for legs and antennae prior to baking. At Playtime, the kids inserted pipe-cleaners into the holes and glued on googlie eyes with PVA glue. I had planned to get the kids to paint them too, but they were happy with them unpainted, so I decided to save myself some cleaning-up. ;)


Song: Ants on my arm 

Story: We read a Sam the Ant book from the Reading eggs series.

Bb

Craft: Butterflies
We gave the kids a butterfly outline. We placed blobs of paint on the paper, then folded it in half. The kids spread the paint around to create beautiful butterfly pictures. 


Song: Bring your bat and bring your ball

Story: The Very Hungry Caterpillar by Eric Carle (the caterpillar turns into a butterfly). 

Cc

Craft: Castanets
One of the other lovely Mums planned this craft (thanks Cara!) We made castanets from cardboard, stickers and buttons. The kids decorated strips of thick cardboard with crayons and stickers. They then glued buttons inside with PVA glue to make the clicking castanet sound. This craft has been really popular with Mr Fun - he loves clicking his castanets and singing the song.


Song: We are clicking castanets

Story: Cookie Cat

Dd

Craft: Drums
This was a really popular craft! Even the kids who don't normally participate in craft time wanted to do this one! I spray-painted empty baby formula tins with gold spray paint. The kids stuck foam pictures to the drums with PVA glue. We then used cheap chopsticks as drumsticks. During story-time, we said a rhyme that involved drumming, so the kids got to test out their new drums.


Song: See me play on my drum

Story: Maisy's Band


Thursday, 24 May 2012

Wind-catcher craft

This afternoon, the boys and I made a cool wind-catcher from simple craft materials. 


1. Use a hole-punch or a skewer to punch 4 holes around the top of a paper cup.

2. Decorate the cup (you could use paint, stickers, glitter, pencils, crayons, etc). We used oil pastels. Yes, Mr Sociable only coloured his black. Mr Fun coloured his green and brown, but then didn't want me to attach any strings to it!

3. Cut 4 lengths of fishing line (about 40cm each). 

4. Tie different craft materials onto the fishing line. We used sequins, feathers, bells, bows and a butterfly. 

5. Use a pipe cleaner to make a small hole in the base of the cup. Thread the ends of the pipe cleaner through to form a large loop for hanging your cup. Twist the pipe cleaner inside the cup to secure it. 

6. Hang on a hook. 

We have actually put ours in the dining room for the moment, so it doesn't get much wind. We had fun blowing on it and using the placemats to create "wind" to make the bells chime. Once it has been displayed for a few days, I am planning to move it to the boys' room, in front of the window.

Monday, 14 May 2012

Sewing with kids: Sewing on hessian

Do you remember sewing with pieces of hessian when you were in primary school? I found some hessian in a cupboard, so I decided to start teaching Mr Sociable some simple sewing.

I bought some thick plastic needles from a sewing shop. I found some scrap wool at home. I traced a picture of a car onto the hessian with a permanent marker. I also drew a tree freehand. Mr Sociable chose the tree (so I made the car). It was really nice to sit together and sew.


I taught him how to stitch in and out along the line. I tied a knot in the end of the wool and I also tied the wool onto the needle (he got frustrated with the wool regularly becoming unthreaded).

We started this project in September last year (a few months before Mr Sociable turned 4). He gave it a good go, but needed quite a bit of help.
Mr Sociable sewing, age 3 years 9 months
Last week, Mr Sociable reminded me about the sewing project and asked if we could finish it. Being a bit older, he found sewing easier this time. He was much quicker, needed less help and his stitches were much more even.


Left: Mr Sociable sewing, age 4 years 5 months
Right: The back (notice the knots and the red marker)
Finally, I cut a frame out of red card to frame the sewing for Nana for Mothers' Day. To make the frame, I cut a rectangle out of an A4 piece of card (leaving a 4 cm border). I used PVA glue to stick the hessian to the border & then stuck a full piece of A4 card on the back - hiding the knots and the red marker.


My Nana loved receiving something that Mr Sociable had made for Mothers' Day. Mr Sociable and I really enjoyed sewing together - I think there will be more of these projects to come! He kept telling me how nice it was to sew together (I think he enjoyed sharing in something that I like to do).

Monday, 23 April 2012

Rainy day craft: Cloud dough

Have you ever made cloud dough? It moulds and crumbles like sand, except that it sticks together (like the topping for apple crumble). It is much softer than sand & you can make imprints in it like playdough.

I saw it in this blog last week, so the boys and I had a go at making some. It was super easy and a great way to use up some of the baby oil that hangs around in my bathroom cupboard. Just mix 1 cup baby oil with 8 cups flour. I unsuccessfully tried to add food dye (yes, I know, food dye is water-based and not likely to mix with baby oil & flour - but I thought it was worth a try). So you may notice a few yellow globs in my dough - next time I will just embrace the "cloudiness" of the dough & leave it white!

Mr Sociable loved getting his hands dirty!
Mr Fun loved tipping in the cups of flour, but was not so interested in the mixing.
Cloud dough
Some ideas for playing with cloud dough

Squish it in your hand to make a hard blob, then crumble it


Roll a knobbly ball around to make imprints


Press it into a spoon to make flat, smooth shapes


Make "sandcastles" (I found this worked better with a soft plastic cup that I could squeeze a little to get the "castle" out).


Make animal or dinosaur footprints


Find interesting things to make impressions in the dough


Mr Sociable spent a long time playing with the cloud dough. Mr Fun quickly lost interest - he spent a long time "watering the garden" with the rainwater we collected last week.


Have a brush handy for cleaning up the flour that goes on the floor (Mr Sociable brushed off his arms and pants too!)

Wednesday, 4 April 2012

Easter Craft that makes a frittata

I remember painting egg shells when I was a child. This year Mr Sociable and I did it together (to give to his teachers at Prep as part of their Easter gift).

Wash the eggs
Pierce the top of the egg with a pin
Pierce the bottom of the egg with a skewer
Blow! This is one time when it is of advantage to be full of hot air!
Wash out the egg (I sealed the bottom hole with my finger, filled
with water, then sealed the top hole & shook the water around in the egg).
Leave to dry for a few days
Paint!
Make a frittata

Sausage, cauliflower & carrot frittata
Have you ever emptied and painted egg shells?

My Little Drummer Boys

Friday, 30 March 2012

Easter Baking with Kids: Cinnamon Crosses (and some other Easter playgroup activities)

This morning was our Easter celebration at playgroup, so I decided to make cinnamon crosses with the kids. They are REALLY easy. I've made them at a few camps, with my own kids and at playgroup a few times.

Cinnamon Crosses


You need:
1 packet puff pastry sheets
melted butter
pastry brush
cinnamon/sugar in a shaker

Defrost a pastry sheet and cut it into 2cm strips. Cut the strips into 2 pieces, one piece longer than the other. Lay the pieces onto baking paper, in the shape of a cross (the longer piece makes the vertical part of the cross, the shorter piece is the horizontal part of the cross).


Now is the fun (kid-friendly) part! Use the pastry brush to "paint" butter over the crosses. Use the shaker to sprinkle them with cinnamon and sugar.


Bake at 180˚C (160˚C fan-forced) until the pastry puffs up and turns golden (5-10mins).

Other Easter playgroup activities

We made Easter Sensory tubs...

Thanks Deb at the Aspiring Mum for the great idea!
and stained-glass windows (which even the 1 year olds were able to do with assistance!)
Mr Fun's craft (with a bit of help from Mummy)
We had an Easter Egg hunt (with plastic eggs containing chickens)...


and talked about how the Easter eggs/chickens remind us of the new life that Jesus gives us.
Related Posts Plugin for WordPress, Blogger...